One way to do it is to connect to router using an Ethernet cable
Step 1: Insert a standard Ethernet cable directly into the green Ethernet port
at the back of their DStv Explora and then insert the other end of the cable into an
available Ethernet port on their router.
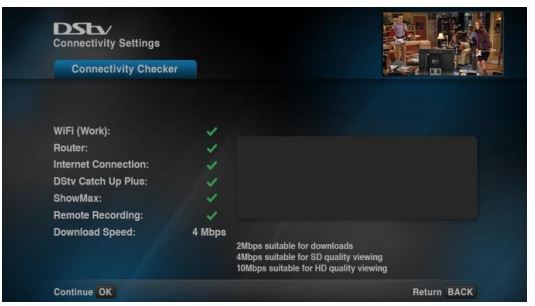
Step 2: Confirm that the DStv Explora is connected to the internet using the Connectivity Checker on the DStv Explora.
- Press HELP on the remote
- Select Tools
- Select Connectivity Checker and press OK
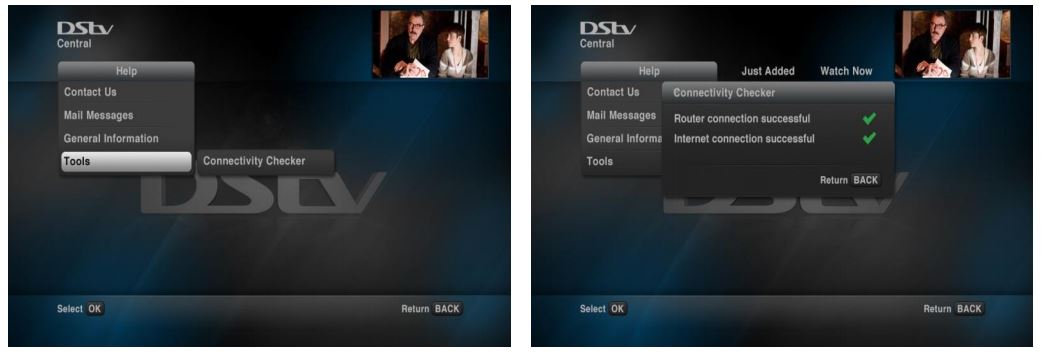
A red cross will indicate if a connection could not be established with any of the connected service's servers, i.e. Catch Up Plus, Showmax or Remote Recordings. The error text container shall display an error for troubleshooting purposes. If any of the connected services are switched off, then the result will be displayed, and no further checks will be done until the checker is run again
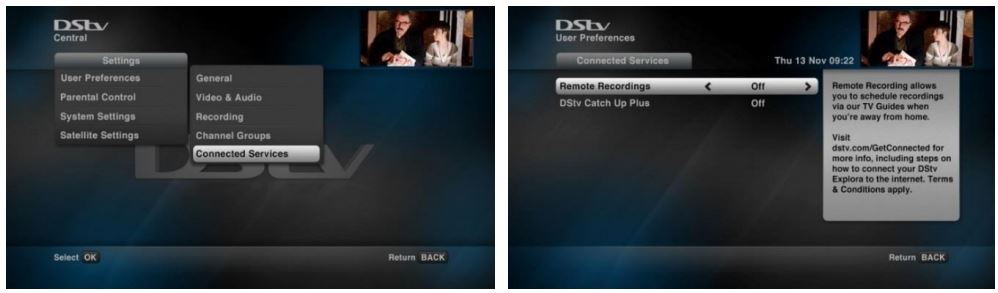
Step 3: The default setting is “Off” for all connected services on the DStv Explora. They will have to be enabled manually using the steps below
- Press the blue DStv button
- Select “Settings”
- Select “User Preferences”
- Select “Connected Services”
- You can then set each of the Connected Services “On” or “Off” individually
- Press BACK to save the setting
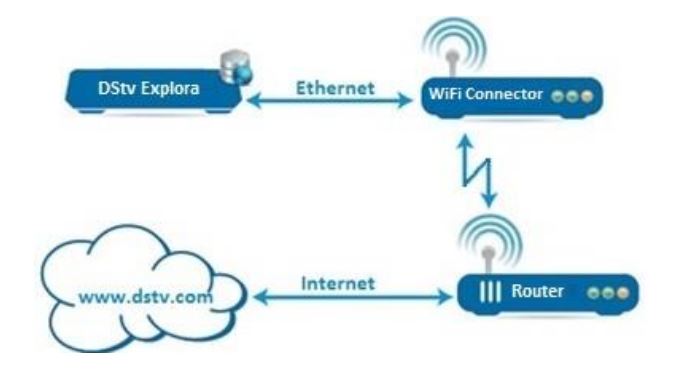
The other way to connect a Dstv explore to the internet is using a DStv Wifi Connector’ a device that allows you to easily, and wirelessly, link your DStv Explora to a router in your home
If the router is in a different room from where the DStv Explora is, or if you want to avoid running an Ethernet cable from the router to the DStv Explora, use the DStv Wi-Fi Connector to connect their DStv Explora to the internet. Wi-Fi signal must be strong enough to reach the room the DStv Explora is in.
There are 2 ways in connecting through the DStv Wi-Fi Connector:
- Option 1 - Automatic setup
- Option 2 - Manual setup
Option 1 - Automatic setup (if their router has a WPS button
- Using the supplied power cable, connect one end into the USB port on the back of the DStv Explora and the other end into the power input on the back of the DStv Wi-Fi Connector
- The Power LED on the front of the DStv Wi-Fi Connector should light-up solid Amber, changing to solid White (confirming it has power)
- Press the WPS button on their router, followed by the WPS button on the DStv Wi-Fi Connector
Wait 2 minutes
The Wireless LED on the front of the DStv Wi-Fi Connector will flash White (while the WPS is in progress) and change to solid White (once a connection is established)
Troubleshooting tip
If the Wireless LED on the DStv WiFi connector flashes amber, there’s a WPS error or security type/password mismatch. It is recommended that the customer use the manual setup. If the Wireless LED on the DStv WiFi Connector is solid amber, the internet connection is weak. The customer must ove the DStv WiFi Connector closer to the router and try again.
- Using the supplied Ethernet cable, insert the one end into the green Ethernet port on the back of the DStv Explora. Now insert the other end into the Ethernet port on the back of the DStv Wi-Fi Connector
- You can now check the connectivity on the DStv Explora
- Press HELP
- Select “Tools”
- Select “Connectivity Checker” and press OK.
- The default setting for all Connected Services on their DStv Explora is set to “Off”. You can manually select which of the services you want enabled
- Press the blue DStv button
- Select “Settings”
- Select “User Preferences”
- Select “Connected Services”
- You can then set each of the Connected Services “On” or “Off” individually
- Press BACK to save their setting
Option 2 - Manual setup (If router does NOT have a WPS button):
- Connect your computer to the router
- Turn Wi-Fi off on the computer
- Using the supplied power cable, connect one end into the USB port on the computer and the other end into the power input on the back of the DStv Wi-Fi Connector
- Using the supplied Ethernet cable, insert the one end into the Ethernet port on their computer. Now insert the other end into the Ethernet port on the back of the DStv Wi-Fi Connector
- Open the web browser on the computer and type http://dstvWi-Fi.local/ into the address bar.
- If the dstvWi-Fi.local does not work then the user can type in the IP of the device, which is 192.168.2.254, into the address bar
- Select their router from the list, enter their wireless password and click on “Connect”.
Troubleshooting tip
- If you get a “WLAN” – network could not be found error – it means your DStv WiFi Connector may be too farfrom your router or your router may be off. Please move the DStv WiFi Connector closer to your router and ensure that the router is switched on.
- If you get a “Wrong password” error– it means you entered the wrong WLAN password. Please enter the correct password and try again.
- Disconnect the DStv Wi-Fi Connector from the computer.
- Using the supplied Ethernet cable, insert the one end into the green Ethernet port on the back of the DStv Explora. Now insert the other end into the Ethernet port on the back of the DStv Wi-Fi Connector.
- Using the supplied power cable, connect one end into the USB port on the back of the DStv Explora and the other end into the power input on the back of the DStv Wi-Fi Connector.
- The Power LED on the front of the DStv Wi-Fi connector should light up (solid amber) and then change to solid white, confirming the DStv Wi-Fi Connector has power.
Wait 2 minutes
The Wireless LED on the front of the DStv Wi-Fi Connector should light up (solid White) once an
internet connection has been established.
Troubleshooting tip
If the Wireless LED on the front of the DStv WiFi Connector is solid amber, the internet connection is weak. To fix this, move the DStv WiFi Connector closer to the router and try again
You can now check the connectivity on the DStv Explora
- Press HELP on the remote
- Select Tools
- Select Connectivity Checker and press OK
The default setting for all Connected Services on their DStv Explora is set to “Off”. You can manually select which of the services you want enabled.
- • Press the blue DStv button
- • Select “Settings”
- • Select “User Preferences”
- • Select “Connected Services”
- • You can then set each of the Connected Services “On” or “Off” individually
- • Press BACK to save their setting
Connect using the DStv WiFi Connector USB3000
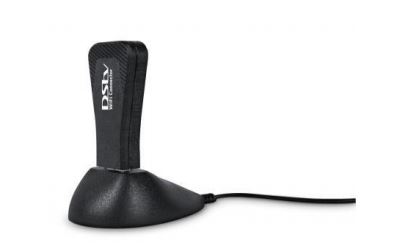
- Insert the USB3000 into the USB Port on either the back or front of the DStv Explora
- The Power LED on the front of the DStv WiFi Connector USB3000 will glow solid white (confirming it has power)
- Press HELP on the remote
- Select 'Tools'
- Connectivity Checker
- Press OK.
- The Connectivity Set-up screen will display
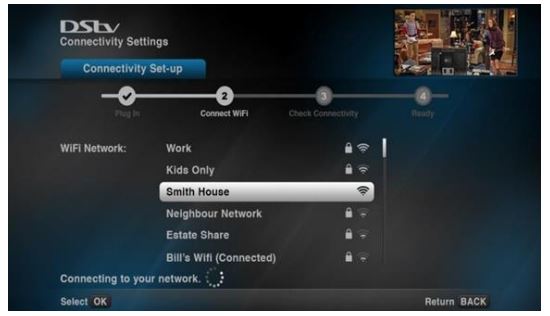
- Searching for a WiFi network will start and the light on the device will blink indicating it is working. Once a network is found, select and enter the WiFi password. If no WiFi network is found, a message will be displayed
Troubleshooting tip
If the WiFi network is not found, move the docking station to a position where it is most, likely to receive a WiFi signal.
If the WiFi network is still not found, check that the router is switched on and connected to the internet. Restart the router if possible.
- If the password entered is correct; the Connectivity Checker screen will display and perform the
necessary checks. If the password is incorrect, the viewer will be prompted to re-enter the password
Note : The setting for all Connected Services should be enabled