The performance of the DStv Explora’s and availability of all features is directly related to the quality of the installation (including the use of approved equipment and correct alignment of the satellite dish. If the below installation wizard steps are not working then you are likely to be experiencing poor signal due to how how your installation is at the time and you will need help from dstv accredited installers to look into your dstv dish installation
⦁ Once the DStv Explora 2 has been correctly connected to the satellite dish and switched on, there is an Installation Wizard to guide you through the first-time set-up
⦁ The customer must contact us to activate the new DStv Explora 2 on Clarity
⦁ There is no DStv Catch Up or Box Office content when the DStv Explora 2 is first installed. This content will start downloading as soon as installation is complete
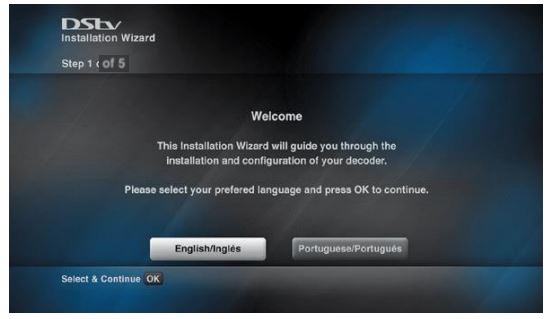
Dstv installation wizard step 1 of 5
Press OK with Next Step highlighted to continue
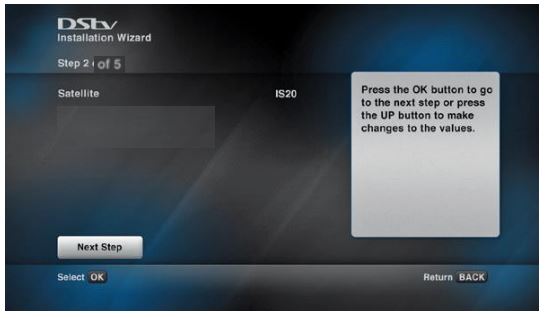
Dstv installation wizard step 2 of 5
- Make sure Satellite is selected to be IS20 for southern dstv territories. Different Dstv territories have different satellite foot prints
- Click on OK when Next Step is highlighted
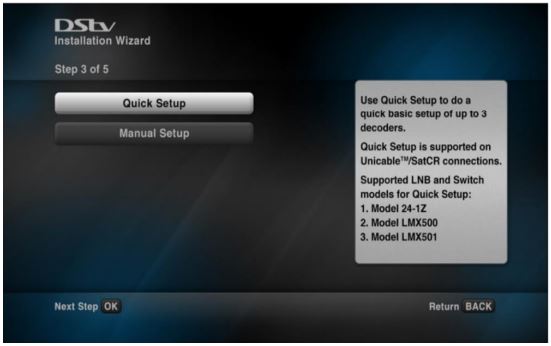
Dstv installation wizard step 3 of 5 - Quick Setup:
Use Quick Setup to do a quick basic setup of up to 3 decoders. This is supported on UniCable/SatCR connections Supported LNB and Switch modes for Quick Setup:
- Model 24-1Z
- Model LMX500
- Model LMX501
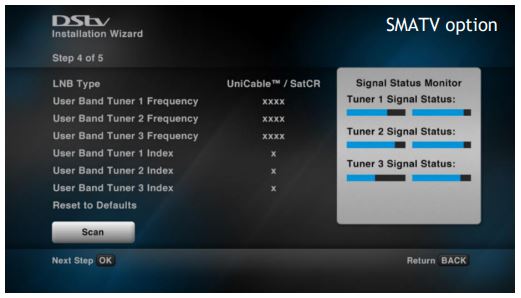
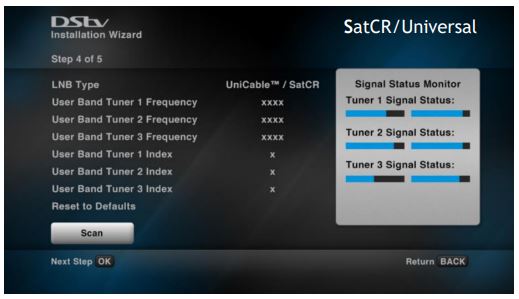
Dstv installation wizard step 4 of 5
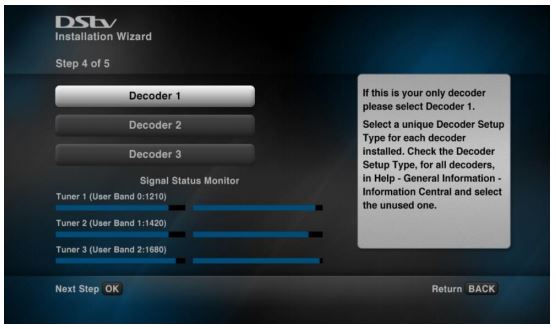
Once the installer has selected a Decoder Setup type for each decoder, predefined User Band will be allocated to each set up, and the User Band allocation will be as follows:
⦁ For Decoder 1 – 0, 1, and 2
⦁ For Decoder 2 – 5, 6, and 7
⦁ For Decoder 3 – 3, 4, and 8
This accommodates XtraView with two decoders combinations with HD PVRs which use user bands 0,1,2,3 by default. In this scenario, the HD PVR would use 0, 1, 2, 3 and Explora would be decoder 2 (5, 6, 7). HD PVR can’t be in XtraView with three decoders, so we use 3, 4, 8 for decoder 3
Help text for each decoder selection
Decoder 1
If this is your only decoder, please select Decoder 1 Please select a unique Decoder Setup Type for each decoder installed in the house. You can check the Decoder Setup Type by checking
⦁ Help –
⦁ General Information –
⦁ Information Central on all other decoders.
Please select an unused one
Decoder 2
If this is your second decoder, please select Decoder 2 Please select a unique Decoder Setup Type for each decoder installed in the house. You can check the Decoder Setup Type by checking
⦁ Help –
⦁ General Information –
⦁ Information Central on all other decoders.
Please select an unused one
Decoder 3
If this is your third decoder, please select Decoder 3 Please select a unique Decoder Setup Type for each decoder installed in the house. You can check the Decoder Setup Type by checking
⦁ Help –
⦁ General Information –
⦁ Information Central on all other decoders.
Please select an unused one
Its not always straight foward when you reach this step becase the decoder will fail to scan. This should help you understand why my dstv decoder is not scanning
Dstv installation wizard step 5 of 5
Once the installer completes the Quick Setup installation process, the scan is initiated

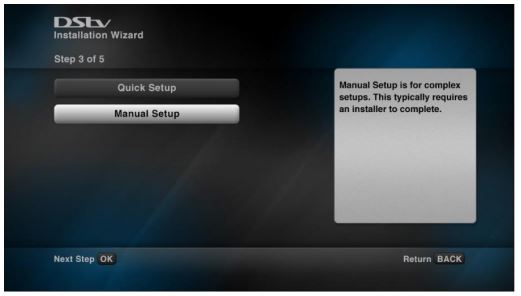
Dstv installation wizard step 3 of 5: Manual Setup
When Manual Installation is selected, the following Help Text will be displayed: Manual Setup is for complex setups. This typically requires dstv accredited installers to complete
Dstv installation wizard step 4 of 5: Manual Setup
The Installer will cycle through SatCR, Universal, SMATV options